
ZK RIA framework is becoming more and more popular framework these days. Most of the folks are beginning to use it, without prior knowledge of JSP, servlets and JavaScripts. Honestly, with ZK you might not even need to know anything about these.
What about Maven with ZK? ZK authors did a good job, making it available through their's Maven repository. Usually, beginners use ZK Studio plugin for Eclpise to automatically setup fresh ZK project. Unfortunately, when using Maven, you must manually set your project to use ZK. This procedure might be confusing for users who are not very experienced with Maven and servlets.
Although, there is a good tutorial on ZK web page, that explains thoroughly how to setup maven ZK project, it lacks some important post-steps like: importing that project into Eclipse and configuring web descriptor for ZK.
This tutorial is based on following tutorials from ZK site and extends them for practical usage:
http://books.zkoss.org/wiki/ZK%20Installation%20Guide/Setting%20up%20IDE/Maven/Use%20ZK%20Maven%20Repository
http://books.zkoss.org/wiki/ZK%20Installation%20Guide/Quick%20Start/Create%20and%20Run%20Your%20First%20ZK%20Application%20Manually
To follow this tutorial, I assume that you installed, configured and most importantly, understand the purpose of following programs:
- Sun's Java SDK
- Apache Maven (Windows users will likely have to dislocate default local repository directory, C:\Documents and Settings\... to other folder without blank spaces)
- Apache Tomcat 6.0
- Eclipse IDE for Java and EE Developers with Tomcat configured as server run-time environment. It is highly recommended to install ZK Studio plugin for Eclipse for easier development, but it is not mandatory requirement.
Note: There is a Eclipse plugin for Maven from sonatype m2eclipse, but because of a numerous reasons it is better to use Maven directly, from command line or console. Keep in mind that this plugin INTERFERES AND CAUSES ERRORS with external Maven, unless configured properly. M2eclipse initially uses embedded Maven's repository which can cause error when we import project into Eclipse. This tutorial uses separate Maven installation and its local repository.
Here is how to switch m2eclipse to external maven. Do this only if you installed m2eclipse plugin. Open Eclipse and go to Window/Preferences/Maven/Installations and Add path where you installed Maven.

Linux users: If you installed Maven using some package manager, then installation directory should be in /usr/share/maven2.
Now, let's start with the tutorial:
1. Navigate anywhere on your computer and in console/terminal type following command:
At the end of the following link there is a nice table that explains which dependencies you require and when. Also link contain additional information on including commercial dependencies.
Mentioned dependencies are bare essentials for ZK. If you are interested, you can browse ZK maven repository here to acquire additional dependencies (like ZK FCKeditor/CKEditor for example).
3. After configuring project pom.xml, next step is to generate Eclipse project configuration files. First, locate yourself into mavenzkwebapp (generated by maven archetype) and then issue mvn command to generate eclipse files:
When you run mvn eclipse:eclipse for the first time, Maven will download all required libraries and place them into your local maven repository. Download might take some time so be patient.
After this, you should have .classpath, .project files and .settings folder in your project folder. If you are under Linux, make sure you can see files prefixed with dot '.' since they are hidden files. With these files, you should be able to import mavenzkwebapp folder as Eclipse project.
Also, you will need to run following command to make sure your eclipse workspace has local Maven repository configured in the classpath.

If you don't see M2_REPO, restart Eclipse to reload workspace settings.
4. In Eclipse for Java EE developers go to File/Import. Select Existing Projects into Workspace and hit Next.
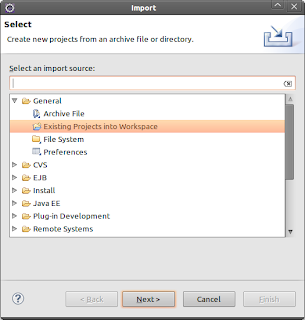 On next dialog, under Select root directory browse to mavenzkwebapp directory. Under Projects make sure that mavenzkwebapp is selected. Click Finish.
 You should have your maven project imported into workspace and visible through project explorer.
 As you can see, all required jars are included and you are almost ready to begin developing ZK applications. Cool feature is that you can browse through source codes of ZK jars (if you specified maven to download sources...).
5. Prepare maven template web project for ZK project. First, let's configure project's web.xml. Go to your mavenzkwebapp project and browse to src/main/webapp/WEB-INF/web.xml. Open it and copy-paste following xml in it.
It is strange that maven generated web.xml based on servlet 2.3, but Eclipse project was set as servlet 2.4. For this reason you need to include web-app_2_4.xsd schema.
Additionally, you can setup timeout page that will be shown when there are no activities after certain time on ZK server. Create new xml file, called zk.xml under WEB-INF folder (folder where web.xml is located). Then paste following xml:
Few more things to do and we are done setting up.
Go to src/main/webapp and delete index.jsp. We will not use Java Server Pages, so there is no need for jsp files.
Finally, create new source folder by right clicking on top of mavenzkwebapp and selecting New/Source Folder. At the end, your entire folder structure should like like this:
 Basically, all of these steps are done automatically if you use ZK Studio to create new project. However, if you want maven support, you will need to do these manually. Now let's code some sample application to see if any of these works.
6. Ok, let's build some basic ZK project. We will create simple web application that notifies selected person. User simply selects person, clicks on Notify and messagebox appears. A bit better then most generic 'Hello World' applicatins.
First create package in src/main/java with the following name: com.glamhacker.mavendemo. Of course, you can create package with any name you want, but you will need to change given files in accordance with the package name.
Next create new Java class that inherits GenericForwardComposer class and name it MainPage (do I need to remind you that you can customize names at all?). Paste the following code into it:

You did it! ZK is finally configured to work through Maven and you got yourself fine looking demo application. This stuff took me a while to compose and I hope that it will speed up creation of project. One thing that I am missing from this tutorial is how to configure Eclipse project properly for developing. As you can see, publishing and coding goes well, but somehow I fell 'safer' with ZK studio generating correct Eclipse project. Tutorial represented here is only a set of basic necessities for ZK project development. Hopefully, you will upgrade it to suit your needs.
Happy ZK codding :)
Here is how to switch m2eclipse to external maven. Do this only if you installed m2eclipse plugin. Open Eclipse and go to Window/Preferences/Maven/Installations and Add path where you installed Maven.

This is screenshot from Windows, since I had there m2eclipse plugin
Now, let's start with the tutorial:
1. Navigate anywhere on your computer and in console/terminal type following command:
mvn archetype:generate -DgroupId=com.glamhacker -DartifactId=mavenzkwebapp
      -DpackageName=com.glamhacker -DarchetypeArtifactId=maven-archetype-webapp
You will need to confirm a version number. This will create a project folder and a structure according to maven standards for java web applications.
2. Inside the generated project, you will find Maven's pom.xml file that explains Maven how to build your project. Your pom.xml should contain following:
<project xmlns="http://maven.apache.org/POM/4.0.0" xmlns:xsi="http://www.w3.org/2001/XMLSchema-instance"
  xsi:schemaLocation="http://maven.apache.org/POM/4.0.0 http://maven.apache.org/maven-v4_0_0.xsd">
  <modelVersion>4.0.0</modelVersion>
  <groupId>com.glamhacker</groupId>
  <artifactId>mavenzkwebapp</artifactId>
  <packaging>war</packaging>
  <version>1.0-SNAPSHOT</version>
  <name>mavenzkwebapp Maven Webapp</name>
  <url>http://maven.apache.org</url>
  <dependencies>
    <dependency>
      <groupId>junit</groupId>
      <artifactId>junit</artifactId>
      <version>3.8.1</version>
      <scope>test</scope>
    </dependency>
  </dependencies>
  <build>
    <finalName>mavenzkwebapp</finalName>
  </build>
</project>
Now open pom.xml and simply copy-paste whole file.
<project xmlns="http://maven.apache.org/POM/4.0.0" xmlns:xsi="http://www.w3.org/2001/XMLSchema-instance"
  xsi:schemaLocation="http://maven.apache.org/POM/4.0.0 http://maven.apache.org/maven-v4_0_0.xsd">
  <modelVersion>4.0.0</modelVersion>
  <groupId>com.glamhacker</groupId>
  <artifactId>mavenzkwebapp</artifactId>
  <packaging>war</packaging>
  <version>1.0-SNAPSHOT</version>
  <name>mavenzkwebapp Maven Webapp</name>
  <url>http://maven.apache.org</url>
  <repositories>
    <repository>
      <id>zk repository</id>
      <url>http://mavensync.zkoss.org/maven2</url>
    </repository>
  </repositories>
  <dependencies>
    <dependency>
      <groupId>junit</groupId>
      <artifactId>junit</artifactId>
      <version>3.8.1</version>
      <scope>test</scope>
    </dependency>
    <dependency>
      <groupId>org.zkoss.zk</groupId>
      <artifactId>zk</artifactId>
      <version>${zk.version}</version>
    </dependency>
    <dependency>
      <groupId>org.zkoss.zk</groupId>
      <artifactId>zul</artifactId>
      <version>${zk.version}</version>
    </dependency>
    <dependency>
      <groupId>org.zkoss.zk</groupId>
      <artifactId>zhtml</artifactId>
      <version>${zk.version}</version>
    </dependency>
    <dependency>
      <groupId>org.zkoss.common</groupId>
      <artifactId>zcommon</artifactId>
      <version>${zk.version}</version>
    </dependency>
    <dependency>
      <groupId>org.zkoss.zkforge.el</groupId>
      <artifactId>zcommons-el</artifactId>
      <version>${zkel.version}</version>
    </dependency>
    <dependency>
      <groupId>org.zkoss.common</groupId>
      <artifactId>zweb</artifactId>
      <version>${zk.version}</version>
    </dependency>
    <dependency>
      <groupId>org.zkoss.zk</groupId>
      <artifactId>zkplus</artifactId>
      <version>${zk.version}</version>
    </dependency>
  </dependencies>
  <build>
    <finalName>mywebapp</finalName>
    <pluginManagement>
      <plugins>
        <plugin>
          <groupId>org.apache.maven.plugins</groupId>
          <artifactId>maven-compiler-plugin</artifactId>
          <version>2.3.2</version>
          <configuration>
            <source>1.6</source>
            <target>1.6</target>
            <encoding>UTF-8</encoding>
          </configuration>
        </plugin>
        <plugin>
          <groupId>org.apache.maven.plugins</groupId>
          <artifactId>maven-eclipse-plugin</artifactId>
          <version>2.8</version>
          <configuration>
            <wtpversion>2.0</wtpversion>
            <downloadSources>true</downloadSources>
            <downloadJavadocs>true</downloadJavadocs>
          </configuration>
        </plugin>
      </plugins>
    </pluginManagement>
  </build>
  <properties>
    <zk.version>5.0.7.1</zk.version>
    <zkel.version>1.1.0</zkel.version>
  </properties>
</project>
Allow me to briefly explain newly inserted tags. Again, I presume that you understand the meaning of Project Object Model xml file for Maven build.<repositories>
<repository>
<id>zk repository</id>
<url>http://mavensync.zkoss.org/maven2</url>
</repository>
</repositories> Since ZK RIA project is not within the central maven repository, it is necessary to add above mentioned URL. This signals Maven to add the given repository URL when searching for ZK artifacts.<dependency>
<groupId>org.zkoss.zk</groupId>
<artifactId>zk</artifactId>
<version>${zk.version}</version>
</dependency>
<dependency>
<groupId>org.zkoss.zk</groupId>
<artifactId>zul</artifactId>
<version>${zk.version}</version>
</dependency>
<dependency>
<groupId>org.zkoss.zk</groupId>
<artifactId>zhtml</artifactId>
<version>${zk.version}</version>
</dependency>
<dependency>
<groupId>org.zkoss.common</groupId>
<artifactId>zcommon</artifactId>
<version>${zk.version}</version>
</dependency>
<dependency>
<groupId>org.zkoss.zkforge.el</groupId>
<artifactId>zcommons-el</artifactId>
<version>${zkel.version}</version>
</dependency>
<dependency>
<groupId>org.zkoss.common</groupId>
<artifactId>zweb</artifactId>
<version>${zk.version}</version>
</dependency>
<dependency>
<groupId>org.zkoss.zk</groupId>
<artifactId>zkplus</artifactId>
<version>${zk.version}</version>
</dependency>
These bunch o' lines add ZK project dependencies. You are required to have these in your web project. To find out which dependencies you require, you must first know which edition of ZK you will be using, since different editions (and edition versions) include different dependencies (commercial editions usually have few more additional dependencies).At the end of the following link there is a nice table that explains which dependencies you require and when. Also link contain additional information on including commercial dependencies.
Mentioned dependencies are bare essentials for ZK. If you are interested, you can browse ZK maven repository here to acquire additional dependencies (like ZK FCKeditor/CKEditor for example).
<properties>
  <zk.version>5.0.7.1</zk.version>
  <zkel.version>1.1.0</zkel.version>
</properties>
Properties define zk.version and zkel.version variables that defines versions of ZK dependencies to use. These values will be replaced in ${zk.version} and ${zkel.version} in dependencies tags. Of course, you can directly input dependencies versions, but with properties feature, you can change versions with single line when needed.
<pluginManagement>
  <plugins>
    <plugin>
      <groupId>org.apache.maven.plugins</groupId>
      <artifactId>maven-compiler-plugin</artifactId>
      <version>2.3.2</version>
      <configuration>
        <source>1.6</source>
        <target>1.6</target>
        <encoding>UTF-8</encoding>
      </configuration>
    </plugin>
    <plugin>
      <groupId>org.apache.maven.plugins</groupId>
      <artifactId>maven-eclipse-plugin</artifactId>
      <version>2.8</version>
      <configuration>
        <wtpversion>2.0</wtpversion>
        <downloadSources>true</downloadSources>
        <downloadJavadocs>true</downloadJavadocs>
      </configuration>
    </plugin>
  </plugins>
</pluginManagement>
Lastly, there are two plugins. One plugin defines compiler plugin, which was not that necessary, but helps if you want to compile your project using Maven. Second plugin is for Eclipse. When we create Eclipse project files in next step, this command will add support for Web Tools Platform, version 2.0. We also specified Maven to download sources and javadocs for given ZK dependencies if available. This is absolutely necessary if we want to Eclipse recognize this project as web project and to allow us web server publishing capabilities.3. After configuring project pom.xml, next step is to generate Eclipse project configuration files. First, locate yourself into mavenzkwebapp (generated by maven archetype) and then issue mvn command to generate eclipse files:
cd mavenzkwebapp
mvn eclipse:eclipse
If build fails, check that you are in mavenzkwebapp folder and see if you created pom.xml correctly.
When you run mvn eclipse:eclipse for the first time, Maven will download all required libraries and place them into your local maven repository. Download might take some time so be patient.
After this, you should have .classpath, .project files and .settings folder in your project folder. If you are under Linux, make sure you can see files prefixed with dot '.' since they are hidden files. With these files, you should be able to import mavenzkwebapp folder as Eclipse project.
Also, you will need to run following command to make sure your eclipse workspace has local Maven repository configured in the classpath.
mvn -Declipse.workspace=/path/to/your/eclipse/workspace eclipse:add-maven-repoTo make sure that path was correct, go to Eclipse and select Window/Preferences and under Java/Build Path/Classpath Variables make sure that M2_REPO variable is added and that it points to your local maven repository.

4. In Eclipse for Java EE developers go to File/Import. Select Existing Projects into Workspace and hit Next.


5. Prepare maven template web project for ZK project. First, let's configure project's web.xml. Go to your mavenzkwebapp project and browse to src/main/webapp/WEB-INF/web.xml. Open it and copy-paste following xml in it.
<?xml version="1.0" encoding="UTF-8"?>
<web-app version="2.4" xmlns="http://java.sun.com/xml/ns/j2ee"
 xmlns:xsi="http://www.w3.org/2001/XMLSchema-instance"
 xsi:schemaLocation="http://java.sun.com/xml/ns/j2ee http://java.sun.com/xml/ns/j2ee/web-app_2_4.xsd">
  <display-name>Glamhacker's ZK Maven Web Demo Application</display-name>
  <listener>
    <description>ZK listener for session cleanup</description>
    <listener-class>org.zkoss.zk.ui.http.HttpSessionListener</listener-class>
  </listener>
  <servlet>
    <description>ZK loader for ZUML pages</description>
    <servlet-name>zkLoader</servlet-name>
    <servlet-class>org.zkoss.zk.ui.http.DHtmlLayoutServlet</servlet-class>
    <init-param>
      <param-name>update-uri</param-name>
      <param-value>/zkau</param-value>
    </init-param>
    <load-on-startup>1</load-on-startup>
  </servlet>
  <servlet-mapping>
    <servlet-name>zkLoader</servlet-name>
    <url-pattern>*.zul</url-pattern>
  </servlet-mapping>
  <servlet-mapping>
    <servlet-name>zkLoader</servlet-name>
    <url-pattern>*.zhtml</url-pattern>
  </servlet-mapping>
  <servlet>
    <description>The asynchronous update engine for ZK</description>
    <servlet-name>auEngine</servlet-name>
    <servlet-class>org.zkoss.zk.au.http.DHtmlUpdateServlet</servlet-class>
  </servlet>
  <servlet-mapping>
    <servlet-name>auEngine</servlet-name>
    <url-pattern>/zkau/*</url-pattern>
  </servlet-mapping>
  <welcome-file-list>
    <welcome-file>index.zul</welcome-file>
    <welcome-file>index.zhtml</welcome-file>
    <welcome-file>index.html</welcome-file>
    <welcome-file>index.htm</welcome-file>
  </welcome-file-list>
</web-app>
I don't know much about servlets and their configurations, so I wont try to explain something that I am not sure. By reading XML tags you can guess what each line means. Anyway, you don't need to know these to be ZK programmer.It is strange that maven generated web.xml based on servlet 2.3, but Eclipse project was set as servlet 2.4. For this reason you need to include web-app_2_4.xsd schema.
Additionally, you can setup timeout page that will be shown when there are no activities after certain time on ZK server. Create new xml file, called zk.xml under WEB-INF folder (folder where web.xml is located). Then paste following xml:
<?xml version="1.0" encoding="UTF-8"?>
<zk>
  <device-config>
    <device-type>ajax</device-type>
    <timeout-uri>/timeout.zul</timeout-uri>
  </device-config>
</zk>
Next, create zul page that will be shown to user when there is a session timeout. Under src/main/webapp create timeout.zul, and paste following xml:<window width="80%" title="Session Timeout" border="normal"> <vbox> The page or component you request is no longer available. This is normally caused by timeout, opening too many Web pages, or rebooting the server. </vbox> </window>
Few more things to do and we are done setting up.
Go to src/main/webapp and delete index.jsp. We will not use Java Server Pages, so there is no need for jsp files.
Finally, create new source folder by right clicking on top of mavenzkwebapp and selecting New/Source Folder. At the end, your entire folder structure should like like this:

6. Ok, let's build some basic ZK project. We will create simple web application that notifies selected person. User simply selects person, clicks on Notify and messagebox appears. A bit better then most generic 'Hello World' applicatins.
First create package in src/main/java with the following name: com.glamhacker.mavendemo. Of course, you can create package with any name you want, but you will need to change given files in accordance with the package name.
Next create new Java class that inherits GenericForwardComposer class and name it MainPage (do I need to remind you that you can customize names at all?). Paste the following code into it:
package com.glamhacker.mavendemo;

import org.zkoss.zk.ui.event.Event;
import org.zkoss.zk.ui.util.GenericForwardComposer;
import org.zkoss.zul.Radio;

public class MainPage extends GenericForwardComposer {
 private static final long serialVersionUID = 4084521215385235831L;

 protected Radio rDeveloper;
 protected Radio rManager;
 protected Radio rAdministrator;

 private int getSelectedRadio(){
  if (rDeveloper.isChecked())
   return 0;
  if (rManager.isChecked())
   return 1;
  if (rAdministrator.isChecked())
   return 2;
  return -1;
 }

 public void onClick$btnNotify(Event ent){
  int rgIndex = getSelectedRadio();
  switch (rgIndex){
  case 0:
   alert("Developer is notified");
   break;
  case 1:
   alert("Manager is notified");
   break;
  case 2:
   alert("Administrator is notified");
   break;
  default:
   alert("Please select person to notify");
  }
 }

}
Lastly, create new zul file index.zul in src/main/webapp and paste this code:<?page title="Glamhacker's Maven ZK Test" contentType="text/html;charset=UTF-8"?>
<zk>
<window title="Notify person" border="normal" apply="com.glamhacker.mavendemo.MainPage" width="400px">
<vbox>
<label value="Select person to notify"/>
<radiogroup id="rg">
<vbox>
<radio id="rDeveloper" radiogroup="rg" label="Developer" checked="true"/>
<radio id="rManager" radiogroup="rg" label="Manager"/>
<radio id="rAdministrator" radiogroup="rg" label="Administrator"/>
</vbox>
</radiogroup>
<button label="Notify" id="btnNotify"/>
</vbox>
</window>
</zk>
At the end, run web application to see results. I am assuming that you configured tomcat correctly.
Happy ZK codding :)
No comments:
Post a Comment